
Configuraciones BIOS
NOTA: Las pantallas del BIOS incluidas en esta sección solamente sirven
de referencia. Las pantallas reales podrían diferir según el modelo y
territorio.
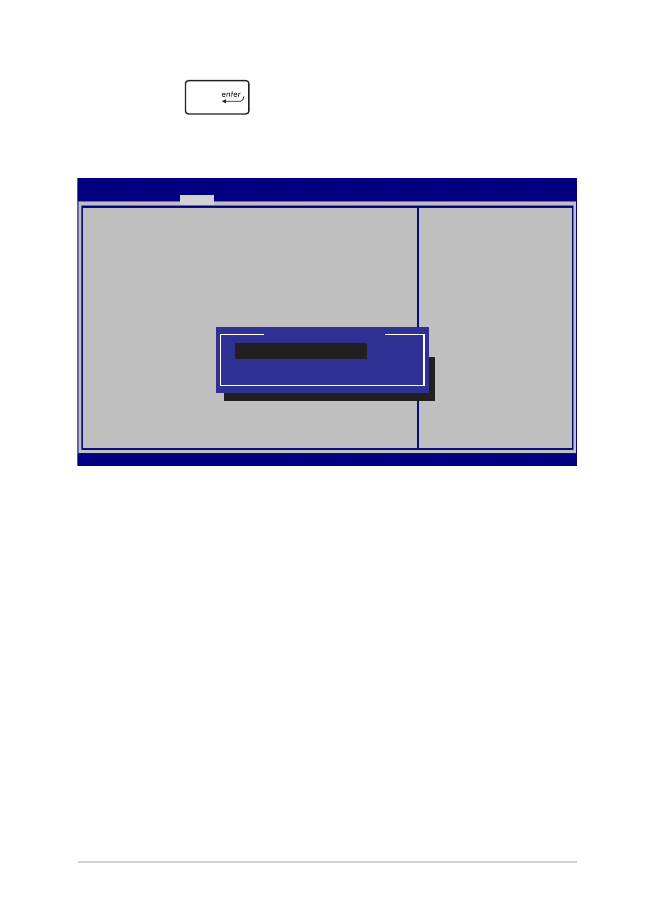
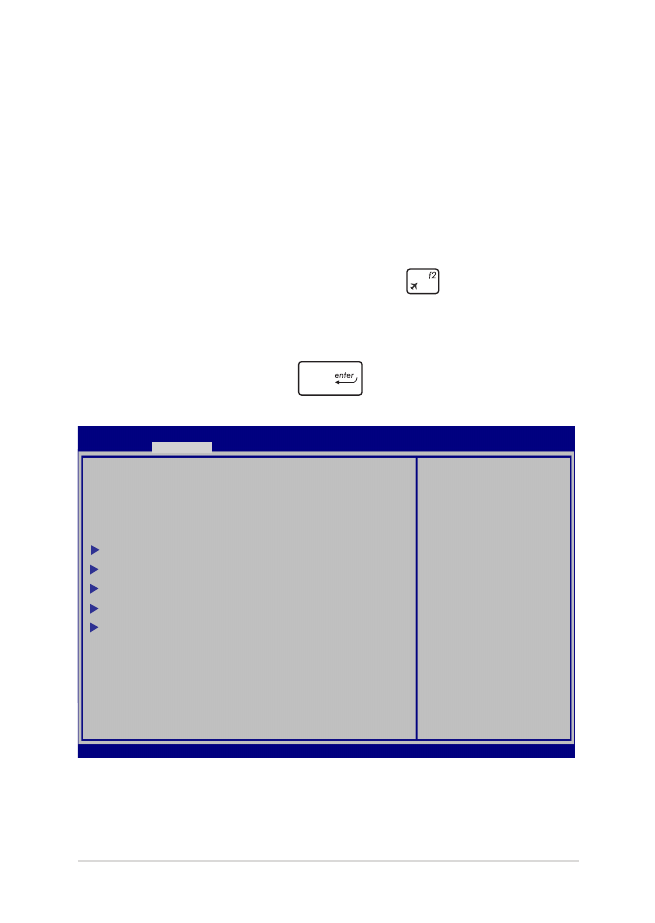
Arranque
Este menu le permite configurar las prioridades de opciones de
arranque. Puede consultar los siguientes procedimientos al configurar
su prioridad de arranque.
1.
En la pantalla Boot (Arranque), seleccione Boot Option #1
(Opción de arranque 1).
→→
: Select Screen
→→
: Select Item
Enter: Select
+/— : Change Opt.
F1 : General Help
F9 : Optimized Defaults
F10 : Save & Exit
ESC : Exit
Boot Configuration
Fast Boot [Enabled]
Launch CSM [Disabled]
Driver Option Priorities
Boot Option Priorities
Boot Option #1 [Windows Boot Manager]
Add New Boot Option
Delete Boot Option
Sets the system
boot order
Aptio Setup Utility - Copyright (C) 2012 American Megatrends, Inc.
Main Advanced
Boot
Security Save & Exit
Version 2.15.1226. Copyright (C) 2012 American Megatrends, Inc.
80
Manual online del equipo portátil
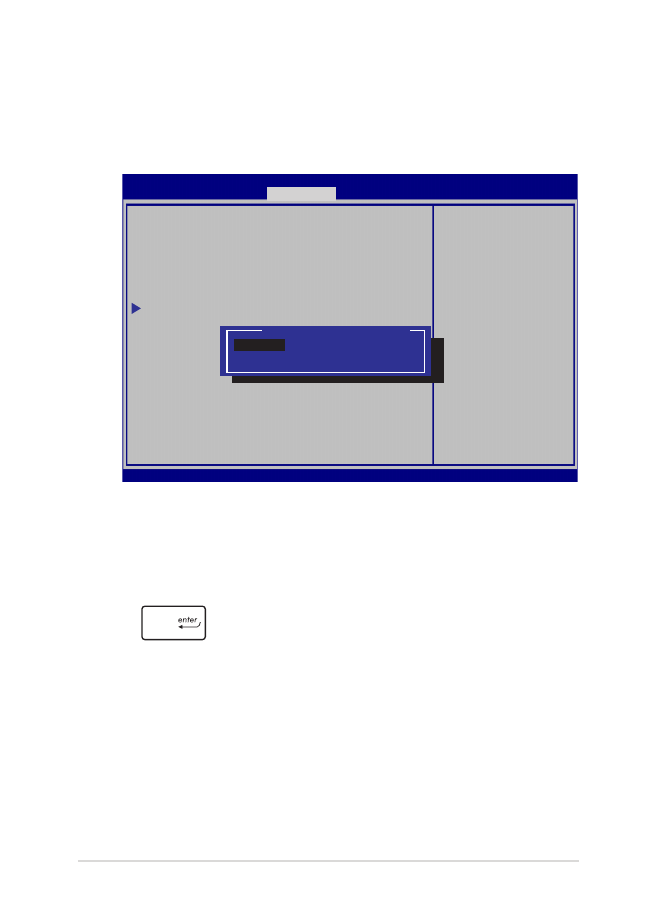
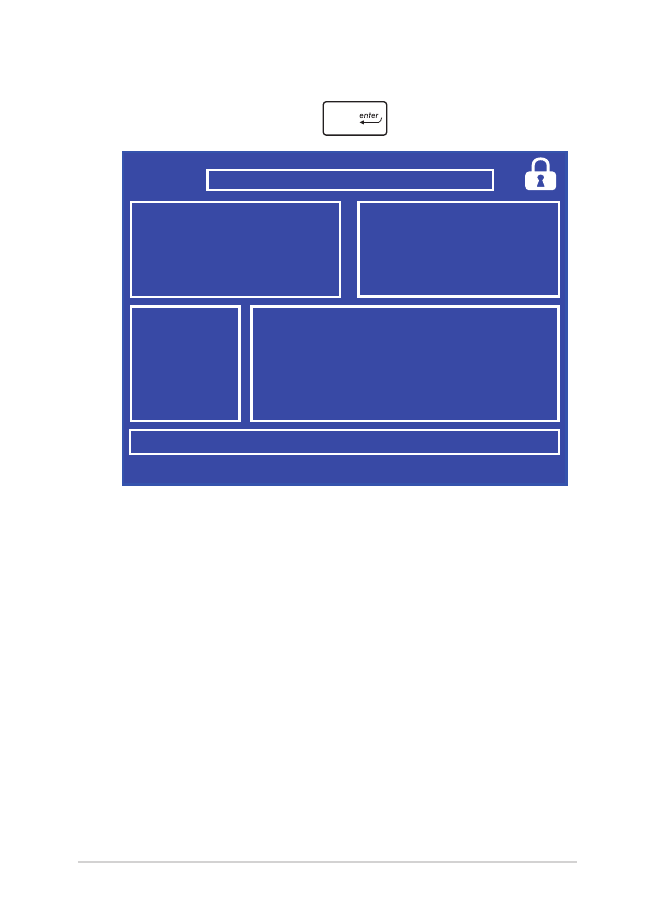
2.
Presione
y seleccione un dispositivo para el elemento
Boot Option #1 (Opción de arranque 1).
→→
: Select Screen
→→
: Select Item
Enter: Select
+/— : Change Opt.
F1 : General Help
F9 : Optimized Defaults
F10 : Save & Exit
ESC : Exit
Sets the system
boot order
Aptio Setup Utility - Copyright (C) 2012 American Megatrends, Inc.
Main Advanced
Boot
Security Save & Exit
Version 2.15.1226. Copyright (C) 2012 American Megatrends, Inc.
Boot Configuration
Fast Boot [Enabled]
Launch CSM [Disabled]
Driver Option Priorities
Boot Option Priorities
Boot Option #1 [Windows Boot Manager]
Add New Boot Option
Delete Boot Option
Boot Option #1
Windows Boot Manager
Disabled

Manual online del equipo portátil
81
Seguridad
Este menu le permite configurar las contraseñas de administrador y
usuario de su equipo portátil. También le permite controlar el acceso al
disco duro de su equipo portátil, la interfaz de entrada/salida (E/S) y la
interfaz USB.
NOTA:
•
Si establece una User Password (Contraseña de usuario), se le
pedirá introducirla antes de entrar en el sistema operativo de su
equipo portátil.
•
Si establece una Administrator Password (Contraseña de
administrador), se le pedirá introducirla antes de entrar en el BIOS.
Password Description
If ONLY the Administrator’s password is set,
then this only limits access to Setup and is
only asked for when entering Setup. If ONLY
the user’s password is set, then this is a
power on password and must be entered to boot
or enter Setup. In Setup, the User will have
Administrator rights.
Administrator Password Status NOT INSTALLED
User Password Status NOT INSTALLED
Administrator Password
User Password
HDD Password Status : NOT INSTALLED
Set Master Password
Set User Password
I/O Interface Security
System Mode state User
Secure Boot state Enabled
Secure Boot Control [Enabled]
Key Management
Set Administrator
Password. The
password length
must be in the
following range:
Minimum length 3
Maximum length 20
Aptio Setup Utility - Copyright (C) 2012 American Megatrends, Inc.
Main Advanced Boot
Security
Save & Exit
→→
: Select Screen
→→
: Select Item
Enter: Select
+/— : Change Opt.
F1 : General Help
F9 : Optimized Defaults
F10 : Save & Exit
ESC : Exit
Version 2.15.1226. Copyright (C) 2012 American Megatrends, Inc.

82
Manual online del equipo portátil
Para establecer la contraseña:
1.
En la pantalla Security (Seguridad), seleccione Setup
Administrator Password (Configurar contraseña de
administrador) o User Password (Contraseña de usuario).
2.
Escriba una contraseña y presione
.
3.
Vuelva a escriba la contraseña y presione
.
Para borrar la contraseña:
1.
En la pantalla Security (Seguridad), seleccione Setup
Administrator Password (Configurar contraseña de
administrador) o User Password (Contraseña de usuario).
2.
Inserte la contraseña actual y presiones
.
3.
Deje el campo Create New Password (Crear nueva contraseña)
en blanco y presione
.
4. Seleccione
Yes (Sí) en el cuadro de confirmación y luego pulse
.
Manual online del equipo portátil
83
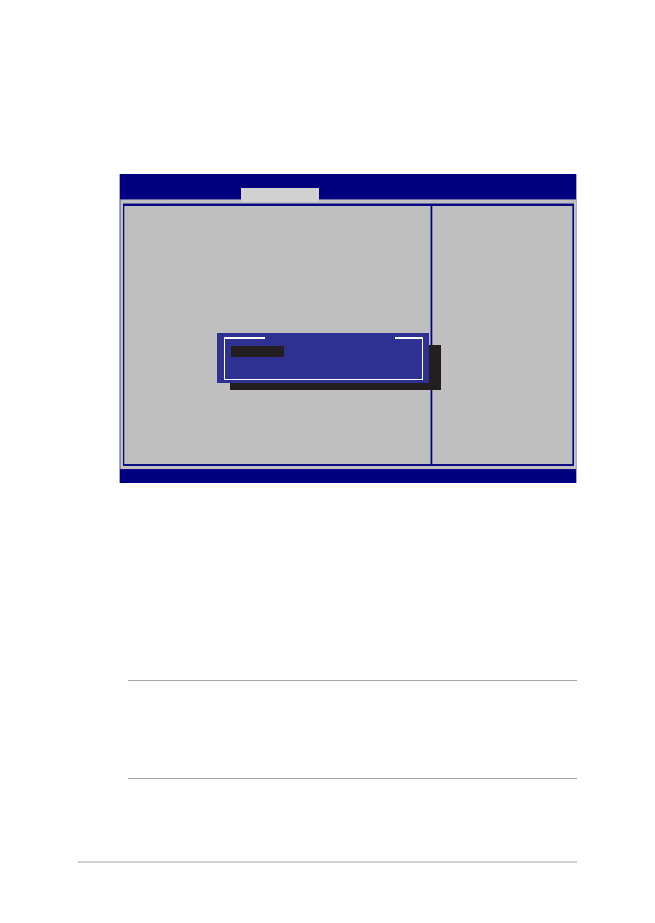
Seguridad de la interfaz E/S
En el menú de Seguridad, puede acceder a la Seguridad de
interfaz E/S para bloquear o desbloquear algunas de las funciones
de su equipo portátil.
I/O Interface Security
LAN Network Interface [UnLock]
Wireless Network Interface [UnLock]
HD AUDIO Interface [UnLock]
USB Interface Security
If Locked, LAN
controller will
be disabled.
Aptio Setup Utility - Copyright (C) 2012 American Megatrends, Inc.
Security
→→
: Select Screen
→→
: Select Item
Enter: Select
+/— : Change Opt.
F1 : General Help
F9 : Optimized
Defaults
F10 : Save & Exit
ESC : Exit
Version 2.15.1226. Copyright (C) 2012 American Megatrends, Inc.
LAN Network Interface
Lock
UnLock
Para bloquear la interfaz de E/S:
1.
En la pantalla Security (Seguridad), seleccione I/O Interface
Security (Seguridad de interfaz de E/S).
2.
Seleccione una interfaz que desee bloquear y haga clic
en
.
3. Seleccione
Lock (Bloquear).
84
Manual online del equipo portátil
Seguridad de la interfaz USB
A través del menú de Seguridad de Interfaz E/S, también puede
acceder a Seguridad de Interfaz USB para bloquear o desbloquear
puertos y dispositivos.
Version 2.15.1226. Copyright (C) 2012 American Megatrends, Inc.
USB Interface Security
USB Interface [UnLock]
External Ports [UnLock]
CMOS Camera [UnLock]
Card Reader [UnLock]
If Locked, all
USB device will
be disabled
Aptio Setup Utility - Copyright (C) 2012 American Megatrends, Inc.
Security
→→
: Select Screen
→→
: Select Item
Enter: Select
+/— : Change Opt.
F1 : General Help
F9 : Optimized
Defaults
F10 : Save & Exit
ESC : Exit
USB Interface
Lock
UnLock
Para bloquear la interfaz USB:
1.
En la pantalla Security (Seguridad), seleccione I/O Interface
Security (Seguridad de la interfaz de E/S) > USB Interface
Security (Seguridad de la interfaz USB).
2.
Seleccione una interfaz que desee bloquear y haga clic en Lock
(Bloquear).
NOTA: Configurar la USB Interface (Interfaz USB) en Lock (Bloquear)
también bloquea y oculta los External Ports (Puertos externos)y
otros dispositivos incluidos como parte de la USB Interface Security
(Seguridad de Interfaz USB).
Manual online del equipo portátil
85
Establecer una contraseña maestra
En el menú de Seguridad, puede emplear la opción Set Master
Password (Establecer una contraseña maestra) para establecer
una contraseña para acceder a su disco duro.
Aptio Setup Utility - Copyright (C) 2011 American Megatrends, Inc.
Set HDD Master
Password.
***Advisable to
Power Cycle System
after Setting Hard
Disk Passwords***
Aptio Setup Utility - Copyright (C) 2012 American Megatrends, Inc.
Main Advanced Boot
Security
Save & Exit
→→
: Select Screen
→→
: Select Item
Enter: Select
+/— : Change Opt.
F1 : General Help
F9 : Optimized
Defaults
F10 : Save & Exit
ESC : Exit
Version 2.15.1226. Copyright (C) 2012 American Megatrends, Inc.
Password Description
If ONLY the Administrator’s password is
set,then this only limits access to Setup
and is only asked for when entering Setup.
If ONLY the user’s password is set, then
this is a power on password and must be
entered to boot or enter Setup. In Setup,
the User will have Administrator rights.
Administrator Password Status NOT INSTALLED
User Password Status NOT INSTALLED
Administrator Password
User Password
HDD Password Status : NOT INSTALLED
Set Master Password
Set User Password
I/O Interface Security
Para establecer la contraseña del disco duro:
1.
En la pantalla Security (Seguridad) haga clic en Set Master
Password (Establecer contraseña maestra).
2.
Escriba una contraseña y pulse
.
3.
Vuelva a introducir la contraseña para confirmarla y presione
.
4.
Haga clic en Set User Password (Establecer contraseña
del usuario) y repita los pasos anteriores para establecer la
contraseña del usuario.

86
Manual online del equipo portátil
Guardar y salir
Para mantener sus ajustes de configuración, seleccione Save Changes
and Exit (Guardar cambios y salir) antes de salir del BIOS.
Aptio Setup Utility - Copyright (C) 2012 American Megatrends, Inc.
Main Advanced Boot Security
Save & Exit
→→
: Select Screen
→→
: Select Item
Enter: Select
+/— : Change Opt.
F1 : General Help
F9 : Optimized Defaults
F10 : Save & Exit
ESC : Exit
Version 2.15.1226. Copyright (C) 2012 American Megatrends, Inc.
Save Changes and Exit
Discard Changes and Exit
Save Options
Save Changes
Discard Changes
Restore Defaults
Boot Override
Windows Boot Manager
Launch EFI Shell from filesystem device
Exit system setup
after saving the
changes.
Manual online del equipo portátil
87
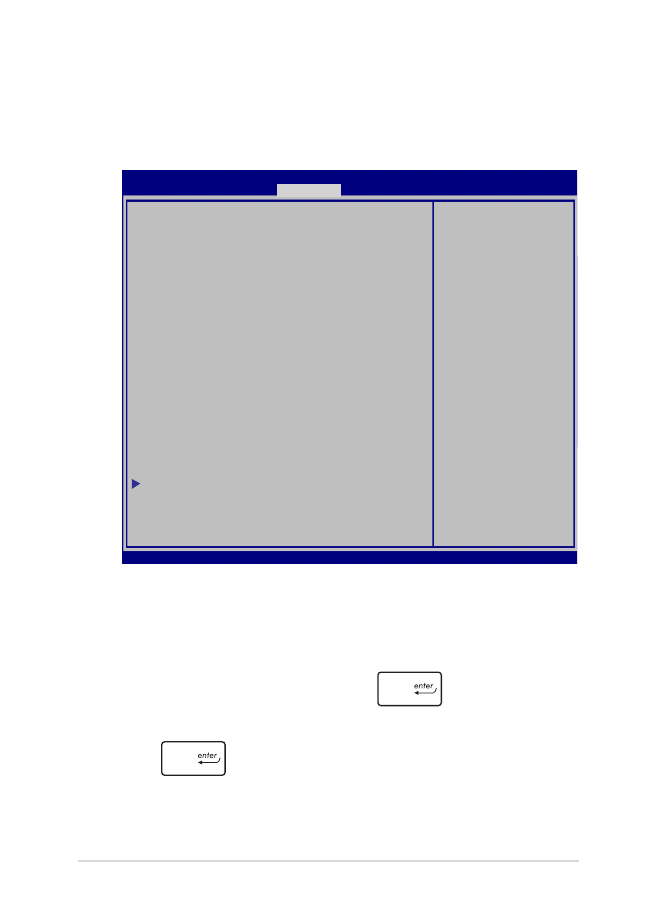
Actualizar la BIOS.
1.
Comprueba el modelo exacto del equipo portátil y el último
archivo de BIOS para su modelo en el sitio web de ASUS.
2.
Guarde una copia del archivo BIOS descargado en una unidad de
memoria flash.
3.
Conecte su unidad de memoria flash a su equipo portátil.
4.
Reinicie su equipo portátil y luego pulse
durante la POST.
5.
En el programa de configuración de la BIOS, haga clic en
Advanced (Avanzado) > Start Easy Flash (Iniciar Easy Flash) y,
a continuación, presione
.
Aptio Setup Utility - Copyright (C) 2011 American Megatrends, Inc.
Start Easy Flash
Internal Pointing Device [Enabled]
Wake on Lid Open [Enabled]
Power Off Energy Saving [Enabled]
SATA Configuration
Graphics Configuration
Intel (R) Anti-Theft Technology Corporation
USB Configuration
Network Stack
Press Enter to run
the utility to
select and update
BIOS.
Aptio Setup Utility - Copyright (C) 2012 American Megatrends, Inc.
Main
Advanced
Boot Security Save & Exit
→→
: Select Screen
→→
: Select Item
Enter: Select
+/— : Change Opt.
F1 : General Help
F9 : Optimized Defaults
F10 : Save & Exit
ESC : Exit
Version 2.15.1226. Copyright (C) 2012 American Megatrends, Inc.
88
Manual online del equipo portátil
6.
Encuentre el archivo de BIOS descargado en la unidad de
memoria flash y luego pulse
.
7.
Después del proceso de actualización de la BIOS, haga
clic en Exit (Salir) > Restore Defaults (Restaurar valores
predeterminados) para restaurar la configuración
predeterminada del sistema.
FSO
FS1
FS2
FS3
FS4
0 EFI
<DIR>
ASUSTek Easy Flash Utility
[←→]: Switch [↑↓]: Choose [q]: Exit [Enter]: Enter/Execute
Current BIOS
Platform: G751
Version: 101
Build Date: Oct 26 2012
Build Time: 11:51:05
New BIOS
Platform: Unknown
Version: Unknown
Build Date: Unknown
Build Time: Unknown
FLASH TYPE:
MXIC 25L Series

Manual online del equipo portátil
89